Dear My Work Station,
This is my art work for Computer Graphics 2 Subject...
The Assignment 1 which is called Postcard, has a theme given by my lecturer which is Dr. Neo Ken..
So, the theme will be 'Malaysia, Truly Asia'....
The main software which I need to do is Adobe Photoshop....
This is what I've learned so far using this tool in class...
Love Photoshop! but I'm more into Illustrator...hihi...
Enjoy! :)
------------------------------------------------------------------------------------
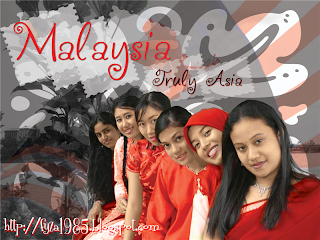 -My Final Postcard-
What is Malaysia, Truly Asia? This is the best theme which promote Malaysia to entire world.This shows that Malaysian people completes the concept of peace and tranquility Same goes to my own finale completion for the postcard. In my postcard, I choose multicultural people in Malaysia. Thus, I'm using the hibiscus because its a symbolic flower and also our national flower. Moreover, I'm inserting the Malaysian flag to give clear view to the tourist about the Malaysian country.I'm choosing red as the main colour since red is one of Malaysian colour. So, I combined all the elements above and well organize plus the edition in order to make the postcard looks simple and the message itself, easy for them to capture the main concept that I've done.
--------------------------------------------------------------------------------------
Project Objective: Learning process in implementing the multiple tools in Photoshop Software in creating the poscard regarding 'Malaysia, Truly Asia' theme.
In this poscard I will be promoting the cultures and festivals of different races that is available in Malaysia.
Approach: I'm creating a postcard based on the pictures that have been taken via websites and alter them by using Adobe Photoshop CS2.
Most of the images taken are .jpeg and .bmp. In Adobe, layering are mostly used since the images have to be placed and arranged on top
of each other. Besides that, filtering such as Gaussian or Radial blur.For the text, I will be using my own fonts. Masking will also be used in this assignment. As for the color, Hue, Saturation and Contrast is used depending on my likings.
The idea for this postcard is where there are three different generation of Malaysian people (Children, Teenagers and Elders). Each generation has different race and religion (Malay, Chinese, India). At the side of the postcard there are images of Malaysian's best; various delicious foods.(Satay, Roti Canai, etc.). There are images that represents each culture, for example (Batik for Malay, Firecrackers for Chinese, and Lamps for India). At the top, the tagline "Malaysia, Truly Asia".
Roles and Responsibilities:
1st Phase: Idea is sketched and images are searched via Google and Yahoo.
2nd Phase: Images are edited, placed inside the postcard. Text are placed too.
3rd Phase: Consult.
4th Phase: Final touches are made. Print the postcard.
5th Phase: Submission for Assignment1
Comment: I love learning Photoshop since it challeged my creativity. The problems that may occur while doing this postcard such as how to edit the images, and
making it blend with each other.
 -Tags For Women Teacher-
 -Tags For Men Teacher-


 -My Dust Pan (View2)-